January 2012 Archives

Enabling cruise control on my 2009 Yaris

|
| Comments (1)
(Standard disclaimer - despite my good looks and brains, I cannot make you do anything. You are responsible for your own actions including deciding whether or not you are capable of performing any DIY work on cars - yours or others. Attempting to do what I describe in this post will probably wreck something, so I will not be held responsible for any damage to you, your car or anything else I don't actually touch with my own fingers.)

Given that I'm practically at the end of my warranty, I took the plunge today and installed (enabled?) cruise control on my Yaris. For much less than it would cost to have Toyota install it. Now to be fair, I don't have the fancy dongle sticking out of the steering wheel, and I don't have all the options enabled - just On/Off and -/Set, but that is all that is really needed; +/Resume? just use the throttle to get up to the desired speed and press -/Set; Cancel? just tap the brake or clutch, or turn the cruise off.

Over at the Yaris Forum is a bunch of excellent articles that show what to do. I stumbled across them a couple years ago, but waited until the warranty had essentially run out before mucking with the electronics.

My car has the power option (power locks / windows), this means all the wiring harnesses are pre-installed and ready to go. The only real cost I had was the clutch switch. That was $35 plus taxes from my local dealership. I could have done without, but if the driver would press the clutch with the cruise engaged, the engine would rev up (hopefully limited by the computer) and would present a danger should the clutch be re-engaged at high RPMs. So that is where I will start, crawling under the dash, on my head to install the clutch switch.

It replaces the bolt, and like I said, all the harnesses are installed already, so I just had to cut some electrical tape to free the clutch switch harness and plug it in.

IMG00180.jpg


IMG00184.jpg
Next came installing the switch(es). I opted not to purchase the cruise control dongle as a) it is expensive, b) it involves removing the steering wheel (and dealing with the airbag) and c) it is not needed as you will see. The wiring to the steering wheel is in place, so all I had to do was splice into the right wires.

IMG00188.jpg

In the original article, the author uses multiple momentary, normally open, push button switches for the various functions. Since I need just On and Set, I opted for a dual throw, momentary toggle switch. I located my switch just below the turn signal switch as that is where there was room.

IMG00185.jpg
IMG00186.jpg

(I had to trim some plastic ribs to get the switch to mount flush)

IMG00190.jpg
IMG00191.jpg
Up turns the cruise on/off, down sets the speed (or reduces it by little bit if already engaged).

IMG00197.jpg
Yay! It works! Adding cruise to a manual transmission 2012 Yaris is a $530 upgrade. I did it for under $50. (BTW, I live in Canada, so that's 100km/h showing on the speedometer.)

Eagle, PCB-GCode, Linux-CNC

|
| Comments (0)
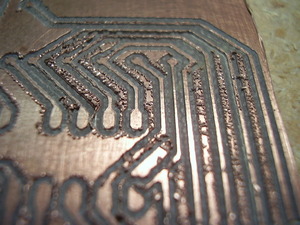
Initial pcb milling attemptThis is the results I got from the following pcb-gcode settings:

General Options (1st tab)
 Milling depth: -0.01
 Isolation
  Default: 0.001
  Maximum: 0.01
  Step size: 0.015

 Etching Tool Size: 0.02

Machine (2nd tab)
 Z Down: 0.007
 Feed Rates
  X Y: 2.0 in / min

Any comments on better settings would be appreciated.

Version 2.1 upgrade in testing mode!

|
| Comments (0)
The machine is now back at home. Since the spinsaw is so screaming loud, the machine has been relegated to the garage. The garage is not insulated. I live in Winnipeg. Normally, in the evening in January the temperature outside is -20C or colder. (-30C is very common - although maybe not this year). So I slapped together a simple man-cave. I insulated the walls and ceiling of an 8'x8' space and draped a tarp and some plastic to complete the cave walls.

Man cave

Since version 2.0, we have beefed up the Z-Axis some more.

Tool mount

The router/spinsaw mount was upgraded to make it stronger and adjustable (tilt angle). The bottom bolts are solid to the axis, there is a grove cut from the plywood to allow the board to flex, and powerful springs push the board out against the aluminum strip and are compressed back to the right angle by the bolts. The board had a hole cut out to fit the saw, complete with groves to line up with the tabs. A slit was cut in the board and threaded rod compresses the board against the saw to prevent slipping.

2A 200 step stepper motor

The stepper was replaced with a 2A unit (being driven at about 0.6-0.7A from 12V at the moment).

Pololu A4988 bus-board
The driver has been replaced with a Pololu A4988 on a custom bus-board. I added a small feature to the board. Between the A4988 and the 4pin stepper header is a 2 pin header. This is in series with one of the motor lines and breaks the circuit. Under normal operation, a 0.1" jumper closes this circuit and all is good. During setup, a small harness is connected instead that allows me to connect my 10A multimeter in series to precisely measure the current of the stepper. This is done at rest, with no inputs running. The unit is adjusted to about 0.6A or a little less. A note about initial setup - turn the pot full counter-clockwise before starting. I had it in the middle, and the current draw was so high it tripped the safety in the PC power supply and would shut down immediately upon powering up.

Here are the Eagle files - including a custom library for the Pololu driver:3 Channel Polulu motherboard.zip

Chokes 1Chokes 2Chokes 3

A whole bunch of chokes have been added to data lines because the electrical noise of the spinsaw rivals the acoustic noise! These have effectively eliminated the electrical noise and random stepping of the Z-axis. A better design for the breakout board was found on the CNC Build Log. It calls for an R/C filter and a logic trigger to filter out the noise. That might be in the works for a new and better breakout board. Feel free to modify the above Eagle files as appropriate.

Table leveling

The results are starting to look very promising! This is a job that mills a flat square space for working on. Eventually I plan on running it across the entire 24"x24" table. But from the burn marks, it looks like I will first have to purchase a better end-mill.

You can have the g-code that runs on EMC software. level-table.ngc By downloading this file, you assume full responsibility for whatever happens to you, your machine, and anything else you do in life.

Enjoy!