Wow. I'm pushing my soldering skills to the limits. I just ordered and received a new receiver board for my Parkzone Citabria. See the rudder servo was damaged last year, and the plane was essentially grounded. The servo's are integral to the receiver board, and unless you are a jeweler by trade, not likely to be repairable. Here is the old receiver:

Last week I spotted a board on eBay for about 1/2 the regular price (including shipping) and decided to get the little guy airborne again. By the way - if anyone is interested, the old receiver board still works electronically. Battery cutoff, speed controller and elevator servo all work fine. Rudder servo motor and pot are fine - just the mechanics are damaged. Make me an offer - shipping to Canada or US is about $10.
When the board arrived, it had the battery connector soldered on - that was a good thing, and not so good thing. For now, it means my lights are not connected - daytime, low crowd flying only. However, the motor leads were NOT provided. I had to solder the motor to the two itsy-bitsy-teeny-tiny pads (no through holes) labeled M- and M+. Oh, and from a previous experience, I first tested the connections before soldering them backwards.... Here's the belly of the board:
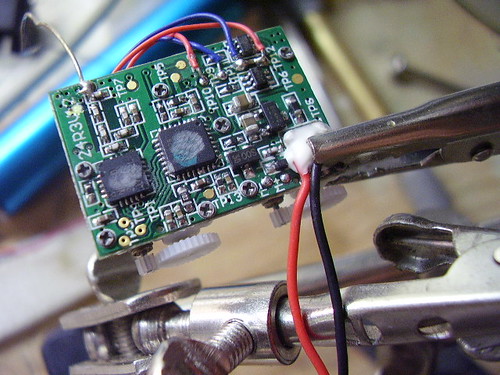
Before soldering, I wanted to test the receiver. This requires binding the receiver to the transmitter. Unlike the old 72MHz days where a receiver and transmitter were configured manually to use a common channel, 2.4GHz equipment all share the same channel. They need to be programmed to listen to only the correct receiver - which is done through a process called Binding. It is quite simple. The Transmitter is started through a special configuration sequence - kind of like an Easter Egg and then the receiver is powered up.
For the Parkzone, you follow these simple steps (they are in the manual if you still have it lying around).
Once the motor was tested, and soldered, the receiver was placed into the plane. I used low temperature hot glue to secure the receiver in place.
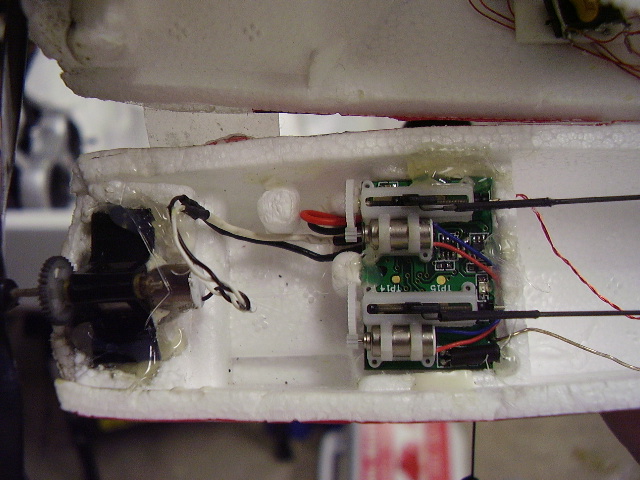
The bottom servo is the elevator, and the top (the one that was damaged) is the rudder.
Last week I spotted a board on eBay for about 1/2 the regular price (including shipping) and decided to get the little guy airborne again. By the way - if anyone is interested, the old receiver board still works electronically. Battery cutoff, speed controller and elevator servo all work fine. Rudder servo motor and pot are fine - just the mechanics are damaged. Make me an offer - shipping to Canada or US is about $10.
When the board arrived, it had the battery connector soldered on - that was a good thing, and not so good thing. For now, it means my lights are not connected - daytime, low crowd flying only. However, the motor leads were NOT provided. I had to solder the motor to the two itsy-bitsy-teeny-tiny pads (no through holes) labeled M- and M+. Oh, and from a previous experience, I first tested the connections before soldering them backwards.... Here's the belly of the board:
Before soldering, I wanted to test the receiver. This requires binding the receiver to the transmitter. Unlike the old 72MHz days where a receiver and transmitter were configured manually to use a common channel, 2.4GHz equipment all share the same channel. They need to be programmed to listen to only the correct receiver - which is done through a process called Binding. It is quite simple. The Transmitter is started through a special configuration sequence - kind of like an Easter Egg and then the receiver is powered up.
For the Parkzone, you follow these simple steps (they are in the manual if you still have it lying around).
- Turn off the transmitter.
- Unplug the battery from the receiver.
- Move the left stick to about the middle (not required, but makes the next step easier)
- Press the left stick into the transmitter - it is a push button - and hold it while you turn the transmitter on.
- The transmitter will enter a special binding state and start beeping continuously. You can let go of the stick and set the transmitter down at this point.
- While it is beeping, plug the battery into the receiver. It will beep and eventually happy beeps all around will indicate the receiver is bound.
- Throttle down, and confirm the right stick is working. Both servos should respond.
Once the motor was tested, and soldered, the receiver was placed into the plane. I used low temperature hot glue to secure the receiver in place.
The bottom servo is the elevator, and the top (the one that was damaged) is the rudder.
Leave a comment